Last updated on July 29 2025
This menu allows you to download, configure and place the templates of the implants you intend to use on your planning.
When you click on the templates button, the objects section is replaced with the template menu.
Beware: The templates dimensions and geometry are provided by the implants’ manufacturer data or templates. In case of incorrect or false data provided by them, liability is excluded.

If you haven’t downloaded the templates yet, you can click on the download button on the top left and access the download manager. From here, you can follow the download instructions we shared in the "Download templates" section.
Every time there is an update of the database, you will receive a notification when starting the software.
After the download is completed, the list of templates available for placement will be displayed. The templates will be filtered according to the subspecialty you selected on the plan configuration step. However, you can search for templates by name or use the available filters and search by manufacturer, type, subspecialty, favorites or 3D only.
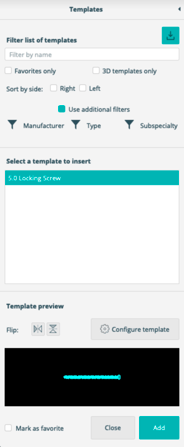
When you find the template you want and select it, you will be able to preview its geometry. From here, you can either add it to the main image straight away by selecting “Add”, or configure it before adding by clicking the “Configure” button. You can change this configuration later in the template card in the objects section.
You can change the template’s orientation as well, by clicking on the buttons and/or
to invert the template horizontally and/or vertically, respectively.
In each template, there is a checkbox that can be activated by clicking on it with the left mouse button to Mark as favorite. This feature adds the template as a favorite, facilitating the way you can find it later.
The templates must be positioned in the image, based on the healthcare professional's previous knowledge and surgical considerations. The positioning of the templates in the planning depends on the environment you are in:
- 2D Environment: you can only enter 2D templates that appear on each 2D renderer;
- Hybrid Environment: you can enter any 2D template to the 2D renderer. If there is a corresponding 3D template it will automatically appear in the 3D renderer;
- 3D Environment: you can only enter 3D templates in the 3D renderer.
In either environment, to move the template you must click on it with the left mouse button and drag it to the most appropriate position.
When selected with the left mouse button, each template will display a set of control options to allow its positioning and rotation. In the 3D environment, there are three rotation handles, one for each orientation (axial, coronal, and sagittal). To rotate the template in the 3D environment, you should press the left mouse button on the rotation handle and move the mouse to the most appropriate position. Clicking the left mouse button outside the template makes the rotation handles disappear.
Note: By not leaving the manufacturer and type options empty, the search returns specific data of the company and the selected type.